Friday, March 2, 2012

Frugal Friday

I visit my local thrift store every Friday. I had been labeling my posts "Thrift Store Friday," but that doesn't sound right. We need some illiteration here (I'm a nerd, I know). So, I am going to use "Frugal Friday" as my weekly series post title. Sounds much better.

Today, they had a box labled "FREE." That's right folks, F-R-E-E. Now, we're talking. How could I resist these cute wooden letters that I found inside?

I pried the little red heart off the C, gave them a sanding, and painted them red. They are now sitting on my new Billy Bookcases. How cute are they???  And, the best part of all was that they were free!!!


Blog Hop Party


There is a NEW awesome tool–Linky Followers
It has so many amazing features (that GFC never had). If you have not signed up you should. (yes you can have both.) I love the new tool so much and want everyone to enjoy all the new features.
…and did I tell you its super easy and FREE!
What better way to celebrate a fun new blogging tool than to have a party so break out your poodle skirt and saddle back shoes cuz’ we’re having a LINKY FOLLOWER PARTY HOP

RULES:

1. you MUST have the LINKY FOLLOWERS tool on your site to participate.

If you see that your link has been deleted you need to add the LINKY FOLLOWER tool to your site and then come back over and re-enter your link
{You can have both the LINKY FOLLOWERS & GFC on your site but you must have the LINKY FOLLOWERS tool to participate in this party hop.}

2. You MUST follow the person who has the party on their site as a thank you.

3. Just add your blog button to the LINKY PARTY below.

4.Then grab the BLOG HOP code

You will find the code right under the Linky Party where it says CLICK HERE TO ENTER
just under that it says: WHAT IS A BLOG HOP? GET THE CODE HERE
Click on GET THE CODE HERE and enter it into a post on your site.
You can grab the party button code in the FOOTER at Its So Very Cheri
You can grab info from my post if it helps you with your post.

5. Then you follow other bloggers–(as many as you want)
–leave each one of the blogs that you follow a comment letting them know you are following them and ask them to follow you back.

If you want to add the BLOG HOP to your own site you will get lots of new followers(see rule #2)

Tuesday, February 28, 2012

Liebster Blog Award

Yesterday, I was honored to be awarded with the Liebster Blog Award from Lindsey over at Todd & Lindsey. They have fantastic recipes, crafts, and home improvement ideas on their cute blog.  Thanks so much Todd and Lindsey!

What the heck is a Liebster Blog Award?

A Liebster Blog Award is given to talented and loved bloggers who have less than 200 followers.


Just a few rules:
Thank your Liebster Blog Award presenter on your blog.
 Link back to the blogger who presented the award to you.
 Copy and paste the blog award on your blog.
 Present the Liebster Blog Award to 5 blogs of 200 followers or less who you feel deserve to be noticed. Let them know they have been chosen by leaving a comment at their blog.

Here are the five up-and-coming blogs that I have chosen to receive this award (in no particular order):


Go check out these awesome blogs. You will be so glad you did.

Thanks ladies for all your inspiration! Pass on the blog love!


I joined a Bloglovin' Blog Hop! Click on the link below for more details!!

Wednesday, February 22, 2012

Making Pictures Pop

I love white. Sometimes I want to paint everything in my house white. But then, nothing would stand out. It would be kind of blah.

About a year ago, I did a project with board and batten on this wall. I painted it white, and then added three framed black and white pictures of my kiddos above it. The wall behind it is an off white color. I wanted to paint it, but it extends all the way down the stairs into the front entrance, which wouldn't look good in any of the colors I liked, so that option was out.
It looked okay, but it needed a pop of color.

This week, I figured out a way to make the pictures stand out without painting the entire wall. Since my frames are square, I just painted a larger square on the wall behind them.

First, I used a level and a pencil to mark where the edges would be and to make sure my lines were straight:

Then I taped off the wall:

I wanted to use the same color paint as the rest of the room, but I didn't have any of that paint left, so I used my highly technical paint mixing skills (e.g. a little of this and a little of that) to whip up a color that was very similar. It looks very gray here (photo taken at night), but it's actully a blue/gray. 

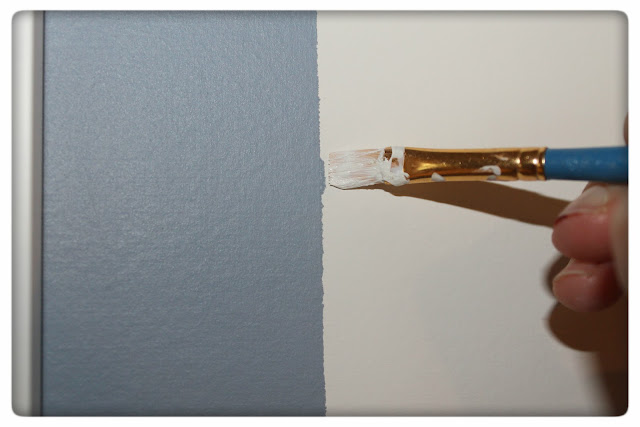
The paint bled a through the tape a little, so I touched it up with a small painter's brush:


I'm so much happier with the way the pictures pop out now against the white wall. Small project = big improvement!

Linking up with:

Measured by the Heart

Fine Craft Guild The Girl Creative
Funky Junk's Sat Nite Special

Friday, February 17, 2012

Thrift Store Friday

It's Friday again!  I went to a different thrift store today. It's a little mom and pop place out in the country. They had the cutest things. I found this vintage wash board for $9. I think I'll hang it right outside my laundry room.


Have a great weekend! 


P.S. If you like this, I found some for sale here.

Tuesday, February 14, 2012

Happy Valentines Day

I don't usually do much Valentine's decorating at my house. However, I did add a few "loving" touches to this mirror. 

Have a great day! 

Wednesday, February 8, 2012

Billy Bookcases!

I'm in love with Billy. Shhhh......don't tell my husband! Ha! Ha!
I spent the last couple of weekends fixing a storage problem for the playroom. A couple of weeks ago I took my annual trip to IKEA and picked up some white Billy Bookcases. I was inspired by
Kate's Billy to Built-Ins.

I knew that I wanted them to look like one bookcase, rather than three separate ones, but mine would be free floating on a large wall, rather than "built-in." 

Kate used the 15" deep bookcases, but my IKEA did not have those, so I had to settle for the 11" ones. I thought the smaller depth might be a problem, but it actually worked out perfectly for us, and saved us some money. The deeper ones were $79 and the ones we used were $49. Score! We used three of these:


The only problem was a gap between the shelves here:


I solved this problem by screwing the shelves together. I was a little worried about the hardware showing, but it's not very noticeable once the shelves are filled:

Next, I added some pine board trim (from Lowes) with a nail gun to hide the gaps and make it look like one unit, instead of three.


I ended up having to mix some paint colors from my collection in order to blend the pine trim with the IKEA white, which is not really white, but more of a cream.

 I am still tweaking the styling of it, but I am content with it at the moment. In the future, I might paint the back/interior, but for now, I am happy with this project. It cost under $200, creates lots of storage, and looks pretty stylish in my opinion.

Check out the cute printable subway art from Anything But Perfect!


Ahhh....organization in the playroom at last!!!

Linking to:


Funky Junk's Saturday Nite Special


Friday, February 3, 2012

Thrift Store Friday

We have this great thrift store close to where I live. They are only open on Fridays and Saturdays. I try to make it out there every Friday, and I almost always find something cute. Today, I picked up this wire basket for $1. It came with the paper and bow. I'm not sure what to do with it yet, but I'll think of something. Valentines Day present, maybe???


Have a great weekend! 

Saturday, January 28, 2012

Organization update

Remember my poorly painted and organized office cabinet here?
Well, I painted the inside white...


added some contact paper that I got from Walmart...
then, bought some Sterilite containers from Dollar General and added some cute free printable labels from Better Homes and Gardens.

Looks better, huh?
I am so into this organization thing right now! I wonder how long it will last....

Linking to:


Funky Junk's Saturday Nite Special

Thursday, January 19, 2012

Office/Craft Room Organization Part 2


I showed you my desk and pegboard in my last post here. Well, here is the other side of my office.


This cabinet was a thrift store find. It looks (and smells) like it came from a church. I have no idea how to describe how a church smells. Just take my word for it (smile). It is really wide. I had to get my dad to help me get it home. It was dark brown wood, beat up and ugly. My dad just looked at me like "why do you even want to bother with this thing?" Well, a coat of primer and paint can work wonders, I tell ya! 

Here is the inside. The paint job in there is horrible, I know. I need to work on that. I also would like to find some pretty baskets or containers to put on the shelves.

The birds in the frames are actually wallpaper. Here's a tip - wallpaper stores will give you a pretty decent size sample for free. That's all it took to frame these cuties.


The wall shelves hold my ribbons and things. The little white boxes came from Michaels and contain things like paper clips, rubber bands, etc.

Let's look a little closer at the wall plaques/signs there on top


That one on the right describes me oh so well!  Ha! Ha! 


Linking to Thrifty Decor Chick

Thursday, January 12, 2012

Office Organization

I work at home full-time, so it is important for me to have a space where I can have all of my office equipment, and keep it neat an organized. Also, I like for it to be pretty to look at, since I spend A LOT of time there. Over the last year, here is what I have come up with. I wish I had some "before" pictures, but all this was done before I knew I would be starting a blog.


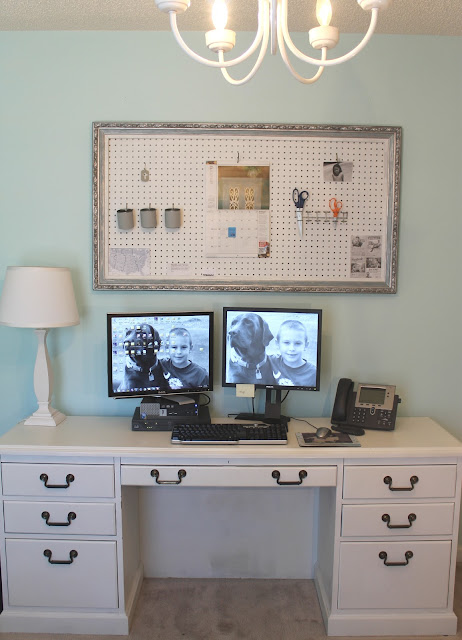
I found the desk at a thrift store for.....wait for it.....$7.00!!!  Wow!Imagine my excitement! It was old and pretty beat up, but nothing that some wood putty and a couple coats of paint couldn't fix. I painted it with Zinzers Oil based primer, and then used a couple coats of glossy white. I sealed it with a coat of polycrete to protect it from wear and tear. The chandy was a thrift store find that I spray painted from ugly brass to white. The lamp shade is from IKEA.

I got the pegboard from a thriftstore about a year ago, not knowing what I was going to do with it. Then I was inspired pictures like these:


via bhg.com

I painted it white, and was planning on building a frame or cutting it down to fit one I already had. I was not looking forward to this part. Well, lo and behold, I was at a garage sale one day and spotted this beautiful frame.

 I had no idea if the frame would fit my pegboard, but at $2.00, it was worth a shot.
 I got it home, took the ugly picture out of it, set it on top of the pegboard, and it fit like a glove. Can you believe my luck???
Don't you just love it when things work out just right?


Featured On The  Crafty Nest

Sunday, January 8, 2012

New Lamp Shades!

Greetings! I am so excited to be writing my very first post!

I have never been totally happy with the way my bedroom looks. My master bedroom is huge, so it's been hard to find furniture and accessories that do not get dwarfed by the walls. Since my decorating is on a pretty tight budget, I just haven't found the right size accessories that were kind to my wallet.
So, my sister suggested new lamp shades. Well, what do you know?  She was so right! I bought these Mix and Match lamp shades from Tar-jay and I think they look SO MUCH BETTER!  What do you think?


I am in love!
By the way, the little alarm clock was also a Target find for $10.00.